
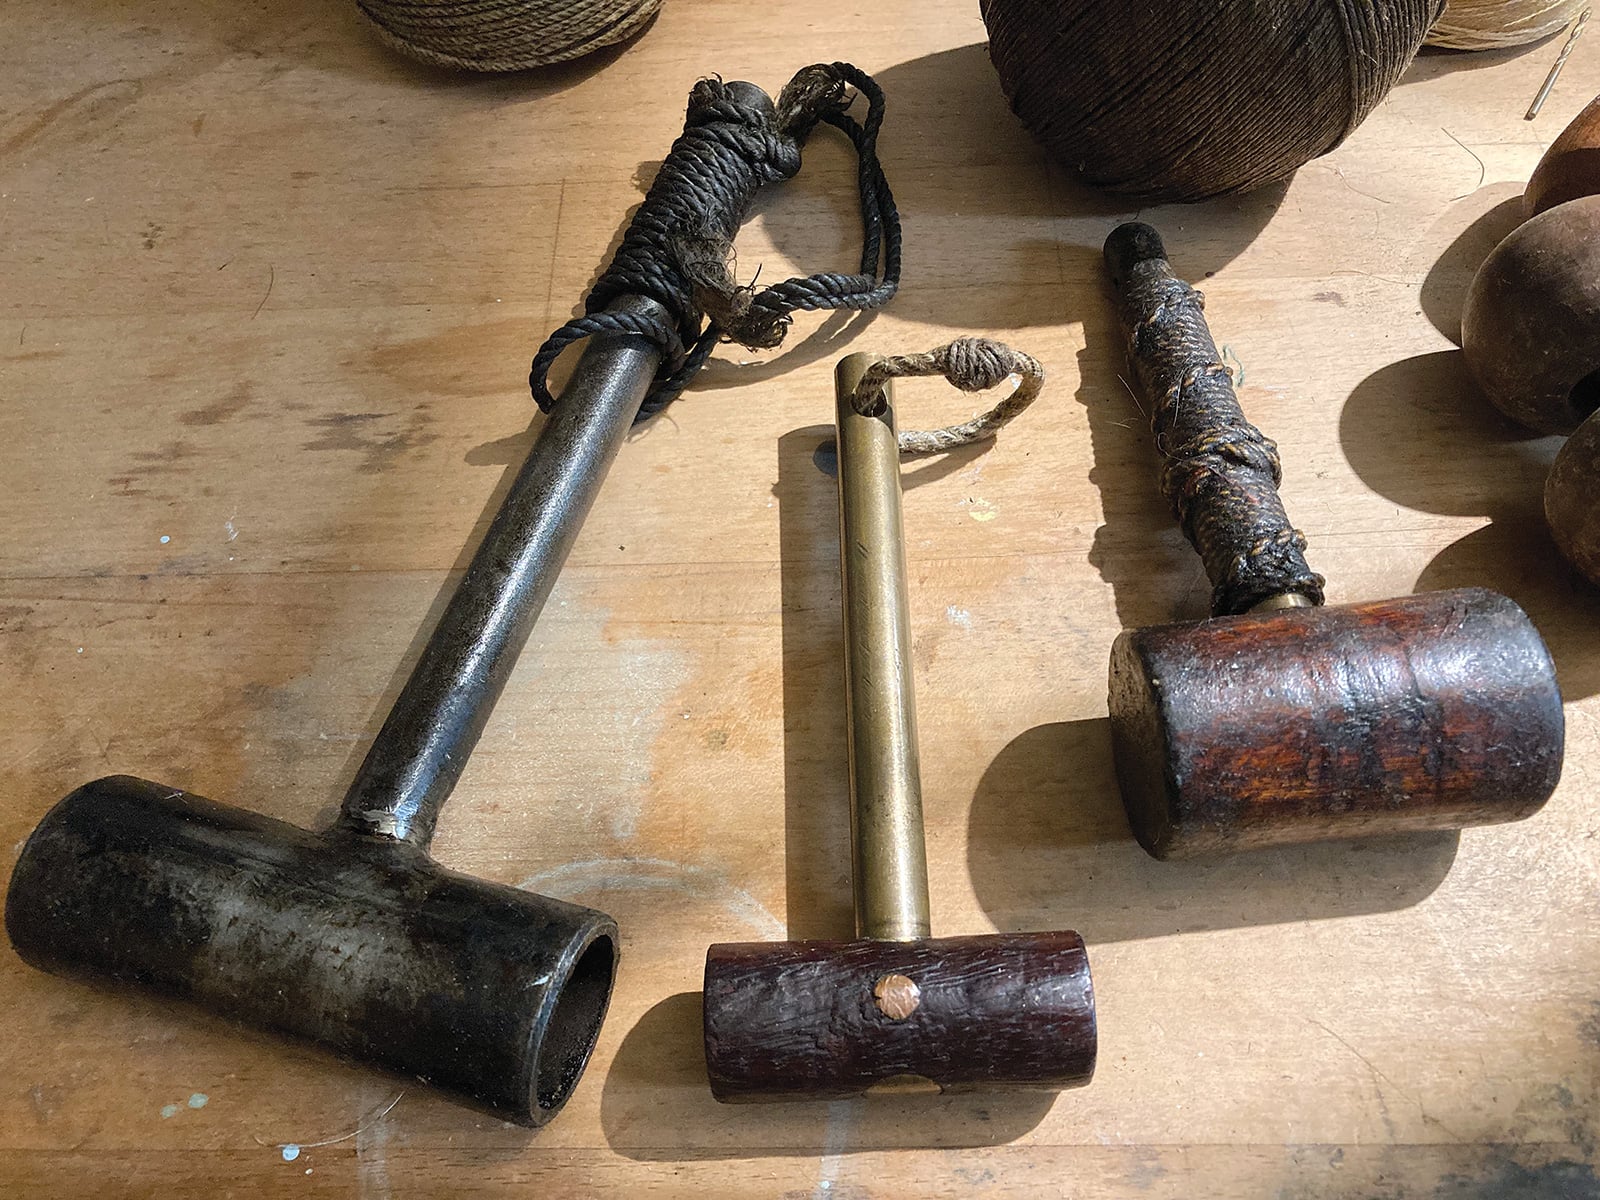
Whether using twine or wire, heaving mallets are essential to haul seizings taut. For working aloft, small heavers such as those pictured here have holes drilled in their handles to receive lanyards.
The heaving mallet, or “heaver,” is a tool used by traditional riggers when a piece of cordage, usually of small diameter, needs to be pulled with a great deal of force. Examples include setting a strand’s tuck in a large splice, tightening the frapping turns of a fiber or wire seizing, or getting the lark’s-head hitch taut to finish tensioning the lanyard on a deadeye. All require a very short but powerful pull. A heaver relies on the binding effect of how the twine is “loaded” onto it, combined with leverage achieved by its handle.
Even the most calloused sailor’s hands can pull just so long on a bit of small stuff before blisters or cuts occur, and even then, only so much force can be achieved. A marlinespike can be used as a handle to grip when pulling small stuff, using a marlinespike hitch, but that is also dependent solely on the strength of the person pulling on it.
Enter the heaving mallet. First mentioned in print by David Steel in his 1794 book The Elements and Practice of Rigging and Seamanship, it was described as “A mallet with a small cylindrical head, used as a lever to strain tight the cross stitches and to beat them close, when sewing on the bolt-rope [of a sail].”
Riggers, it seems, quickly took this concept from sailmakers and began using such mallets as well, in various sizes. Heavers were often all wood, but some were made with metal (usually brass) heads or handles, especially when wire seizings came into use in the mid-1800s; they were used to tighten the frapping turns of wire seizings and the final hitches, as well as to hammer the seizings flat. Occasionally, I see beautiful sailor-made examples of mallets with ebony heads and whalebone handles—usually misidentified as “caulking mallets.” The giveaway is the pristine face of the mallet, and scores around the cylinder and the base of the handle, indicating how massive friction has left its mark.
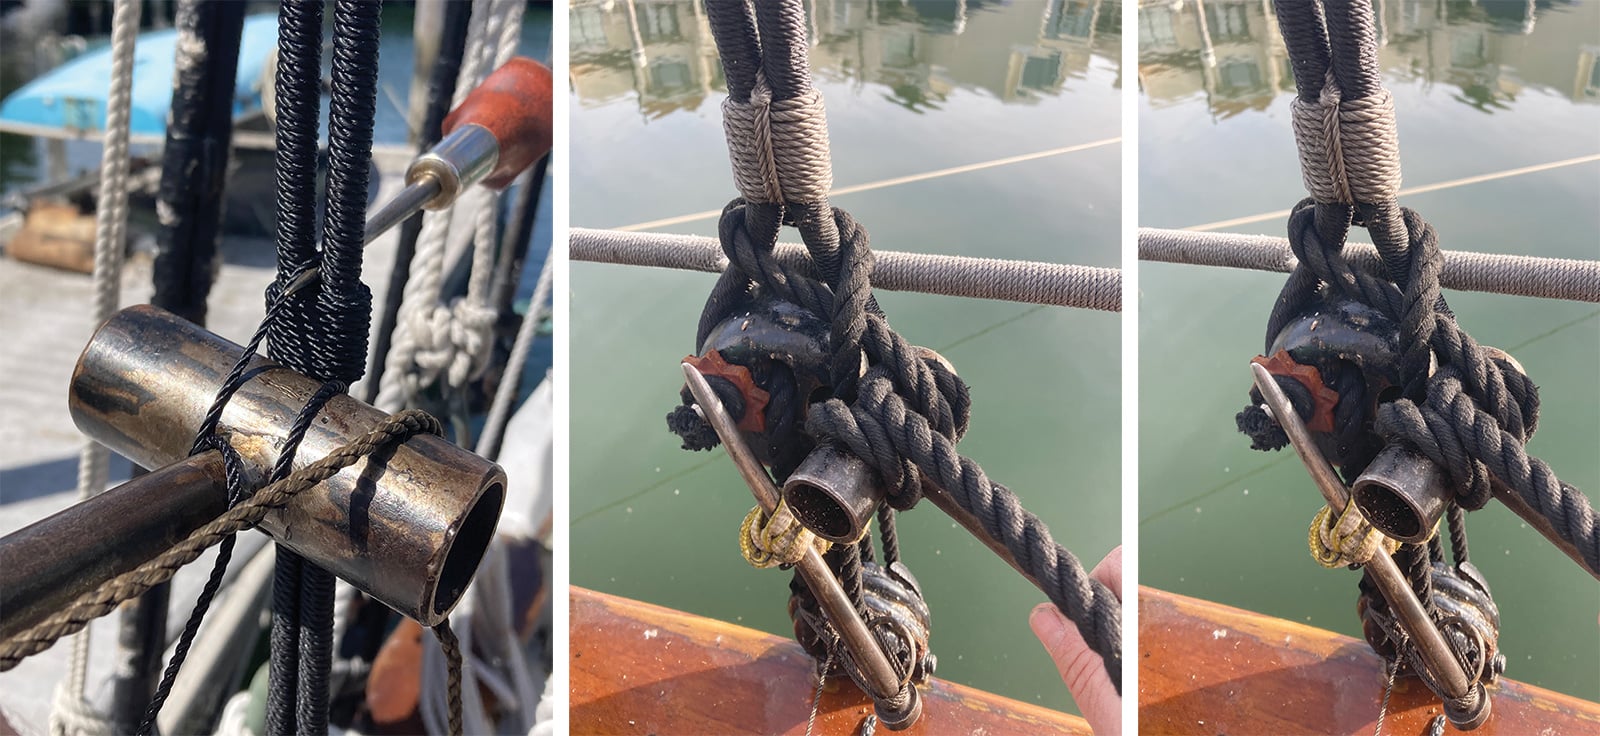
Above left—A heaving mallet in action, tightening the first frapping turn of a seizing on a backstay. The awl is driven in to hold the tension, allowing the heaver to be slacked. The larger gray line passing over the heaver head is the lanyard attaching the mallet to the shroud, since the steel won’t float if it slips and falls overboard. Above center—Using the mallet, the first turn of the lark’s head is tightened to finish off tensioning a deadeye lanyard. Above right—And finally, the second part of the lark’s head is tightened.
Clifford W. Ashley doesn’t mention heaving mallets in Ashley’s Book of Knots, nor does Hervey Garrett Smith in The Marlinspike Sailor, which I find interesting. Darcy Lever, in The Young Sea Officer’s Sheet Anchor, only says that a nipper holding a large strop to a block is “hove taught with a Heaver,” but gives no other explanation. In print, only Brion Toss, in The Rigger’s Apprentice, and Des Pawson, in his writings and videos, seem to describe the use of this absolutely necessary rigging tool. Most people hear about them as some bit of rigging arcanum passed down, a little technique from those “in the know.”
I was first introduced to the heaving mallet by the master rigger Jim Barry back in 1995, when we were working on HALF MOON, a replica of the explorer Henry Hudson’s ship built in Albany, New York. I was just learning the rudiments of traditional ship rigging, and he taught me how to clap on a seizing with a mallet. We went up to New Bedford, Massachusetts, on a shopping expedition to kit me out. In the cellar of a touristy T-shirt shop called (I kid you not) “Moby Dick’s,” we found barrels of old whaling irons, crates of wooden fids, boxes of serving mallets of various sizes, and stout wooden heaving mallets. Some of the tools I still use came from this pilgrimage; I sought out the store again years later, only to find that it had gone up in flames. I mentally kicked myself for not buying more.
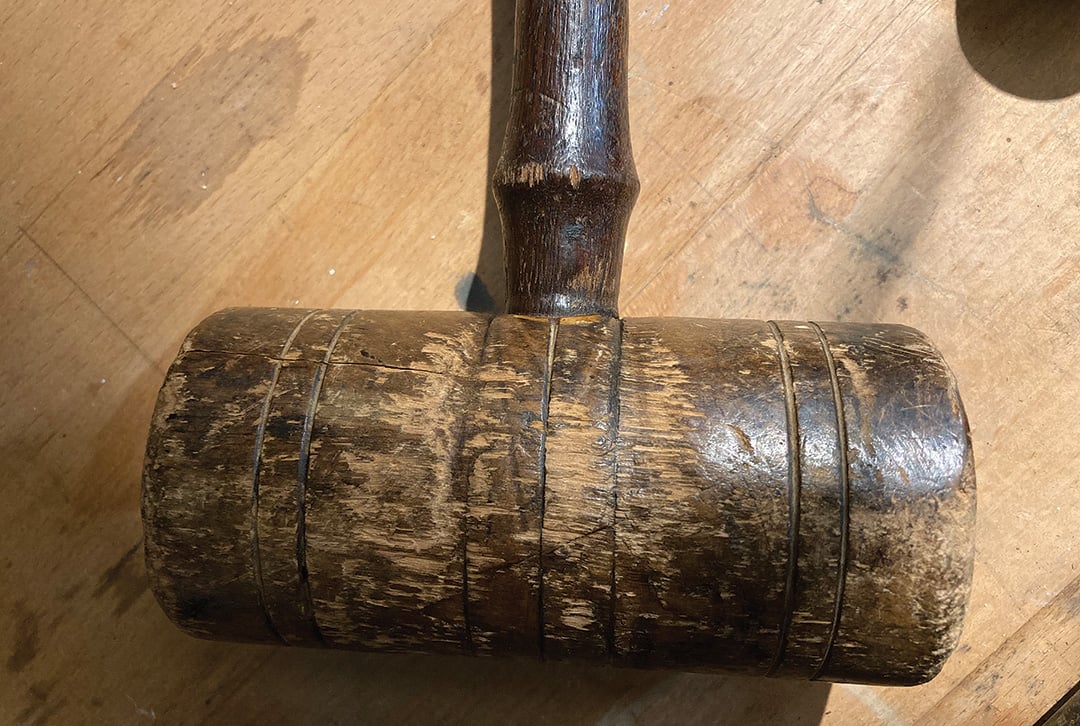
Wooden-headed mallets show wear from heavy use.
In any event, with unscarred mallet in hand I learned the heaving-mallet hitch and proper use in tightening the turns of block strop seizings, ratline lashings, and the first and last turns of service.
In the particular variation of finishing seizings I learned from Jim, which he took from wire-seizing completion, the seine twine is formed into a clove hitch around the frapping turns, and a quick pull on the heaver handle not only tightens the knot but also snaps the nylon twine in an exceptionally satisfying way!
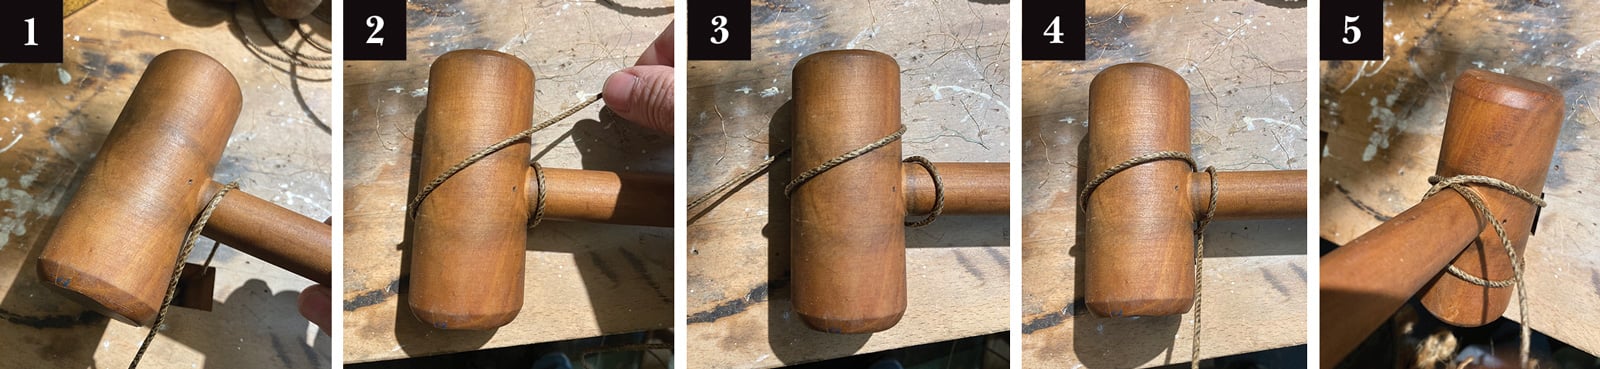
1. First, twine goes over the handle and down. 2. Next, twine is passed under the head and diagonally across to the other side of the handle. 3. Then, the twine is passed under the head. 4. The twine is drawn straight under the handle. 5. Finally, when the handle is rotated around the pivot head, the hauling part pinches down on the loose working end, fixing it in place and completing the hitch.
The heaving mallet hitch is the same no matter the material: Lay the mallet head right at the place you want to pull; take the line straight up, over the handle, and down where the handle meets the head; around the underside of the head then diagonally across the top of it and down; then pull toward you under the handle, as shown in the photograph sequence above. The part with the load bears down on the loose end, locking it in place. Now you are ready for the second action: Using the round head as a pivot, the length of the handle provides massive leverage for pulling on the line. If you need to pull farther, it isn’t necessary to remove and reload the strand; just swivel the mallet and take up what you’ve gained around the handle, and you’re ready to take another bight of the line.
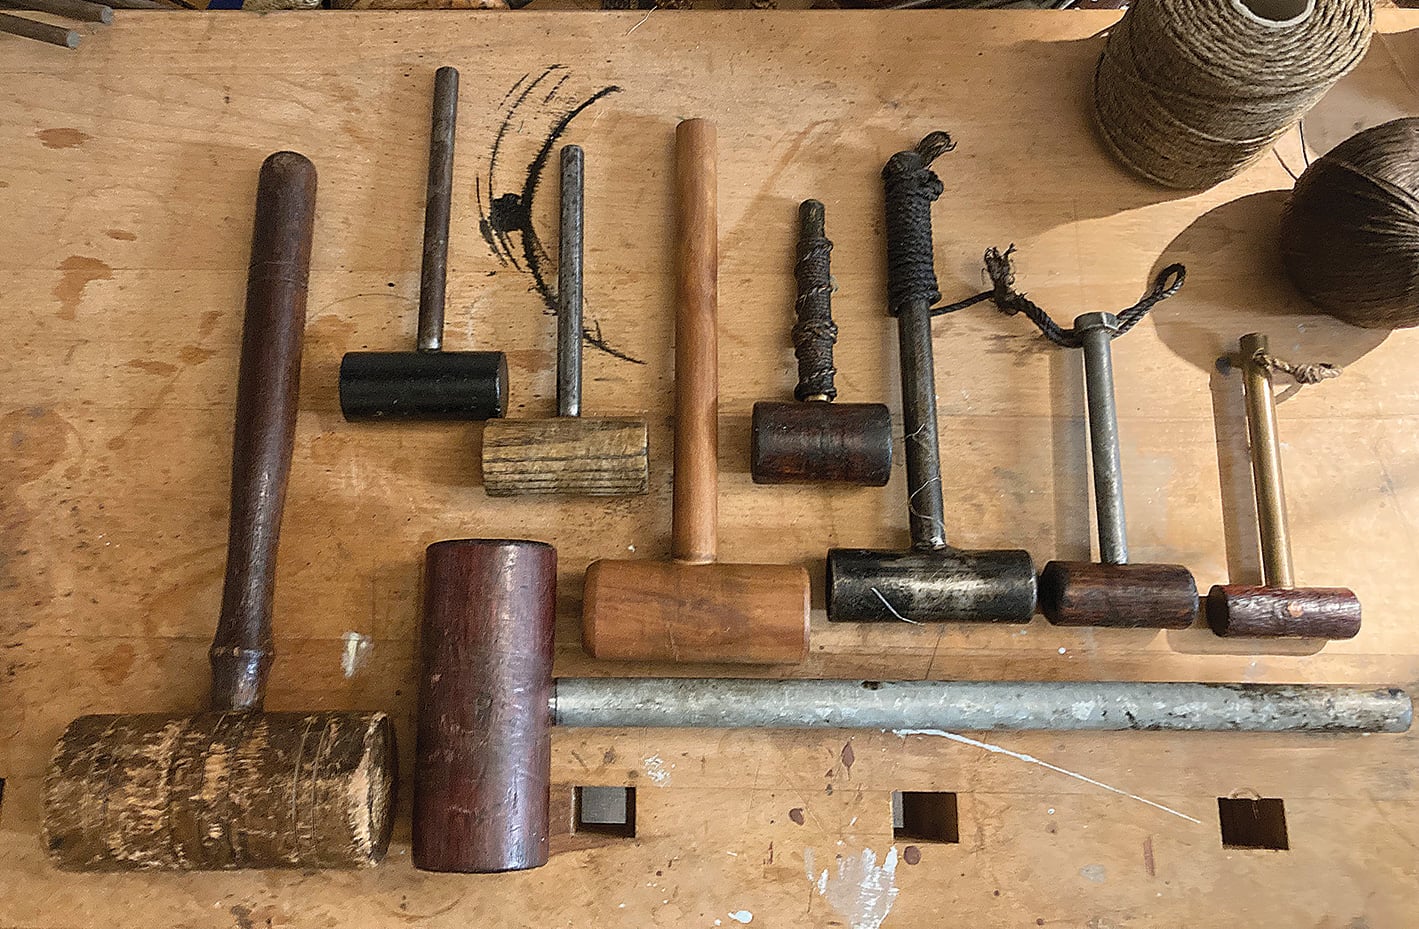
Each of the author’s various heaving mallets is made for a specific weight of twine or wire.
I’ve known a few riggers who can load the mallet simply with an elegant flip and twist of the wrist…a level of mastery for which I have much respect.
Most of the riggers I know make their own heavers and often decorate them with some fancy work on the handles. Small mallets, 6″ or 7″ long, are handy enough to carry in a ditty bag or take aloft with a lanyard attached. They can tackle most jobs around the ship.
I have several mallets, from a very small one that I use mostly when doing fancy knotwork, to an all-purpose knockabout made of welded steel, all the way up to a large mallet with an 18″ handle used for shroud seizings in 10mm line or heavy galvanized wire.
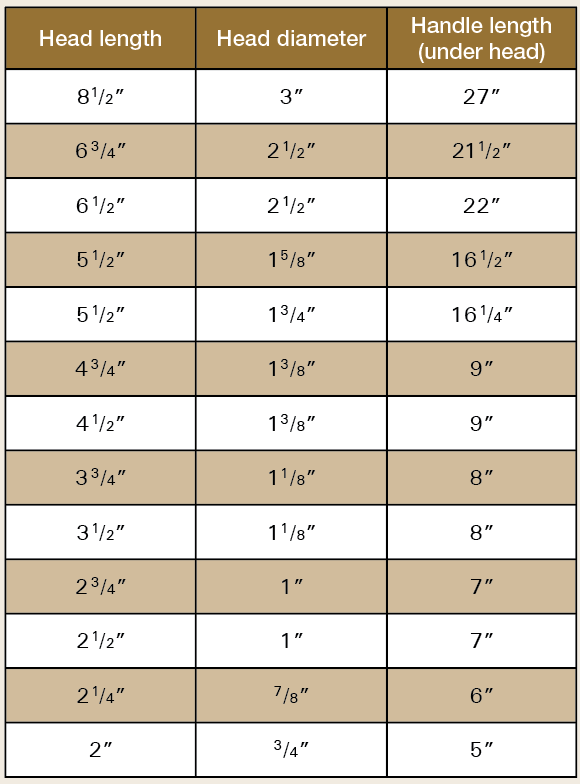
Heaving Mallet Dimensions (from the British Royal Naval Rate Book, 1922–23).
The British Royal Navy pricing books of the early 1900s, as shown in Des Pawson’s monograph Heavers as Used by Riggers and Sailmakers, list up to 13 different sizes and proportions of heads to handles, with heads usually made of lignum-vitae and handles of greenheart (see table, page 89). I would recommend following the guidelines. I have a couple of mallets beautifully crafted of exotic wood heads and bronze handles that simply don’t work well because the handle is too svelte for the head. Conversely, I’ve used mallets with diminutive heads in comparison to the handle, which don’t feel right in the hand or grip twine properly. 
Courtney J. Andersen is a freelance traditional rigger working in the San Francisco Bay Area.